Depending on the user’s role, edit and viewing rights could be limited to:
- Own profile
- Direct reports
- Profiles of respective BSU
To edit one’s profile, follow the steps below:
Profile Management in the Dashboard
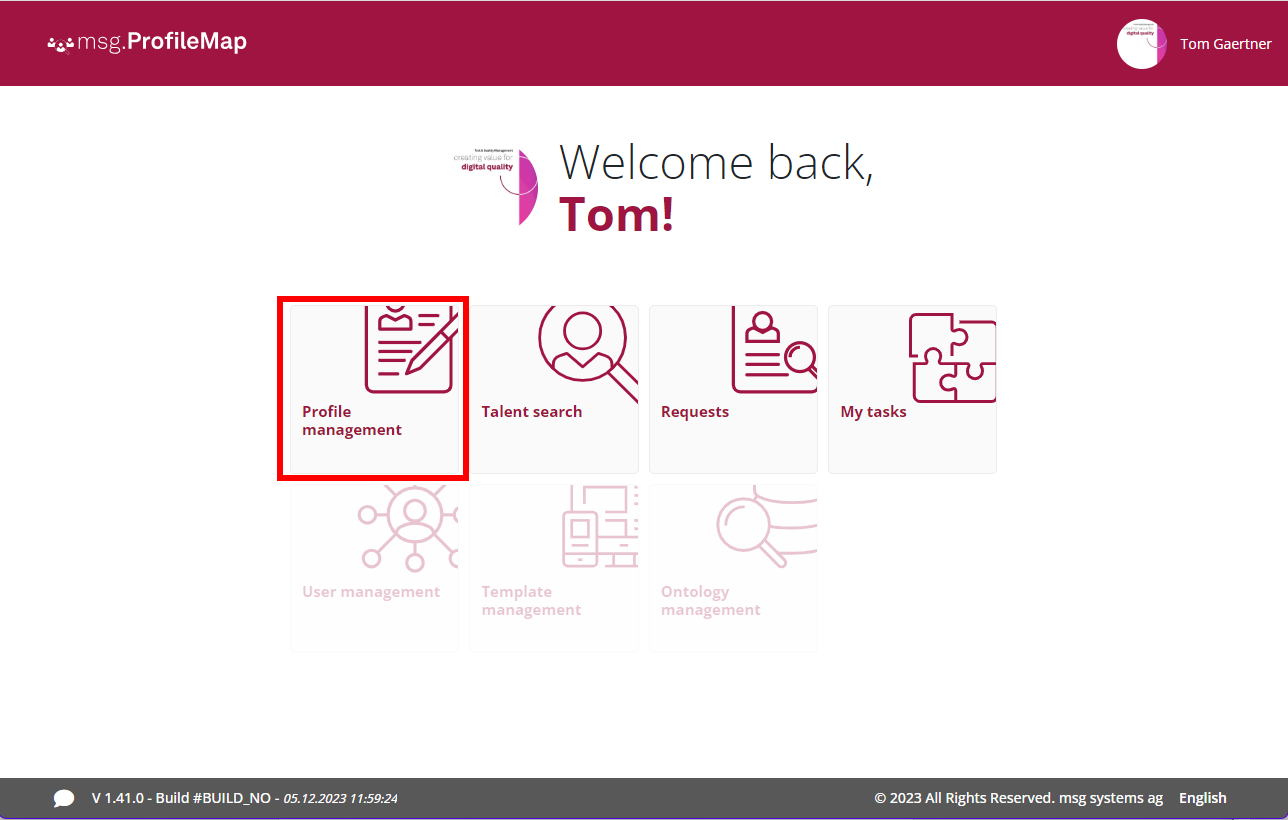
Select “Profile Management” on the dashboard.
Overview of different Areas
In this chapter a short overview of the Profile Management screen is provided.
Details for each part will follow in later chapters.
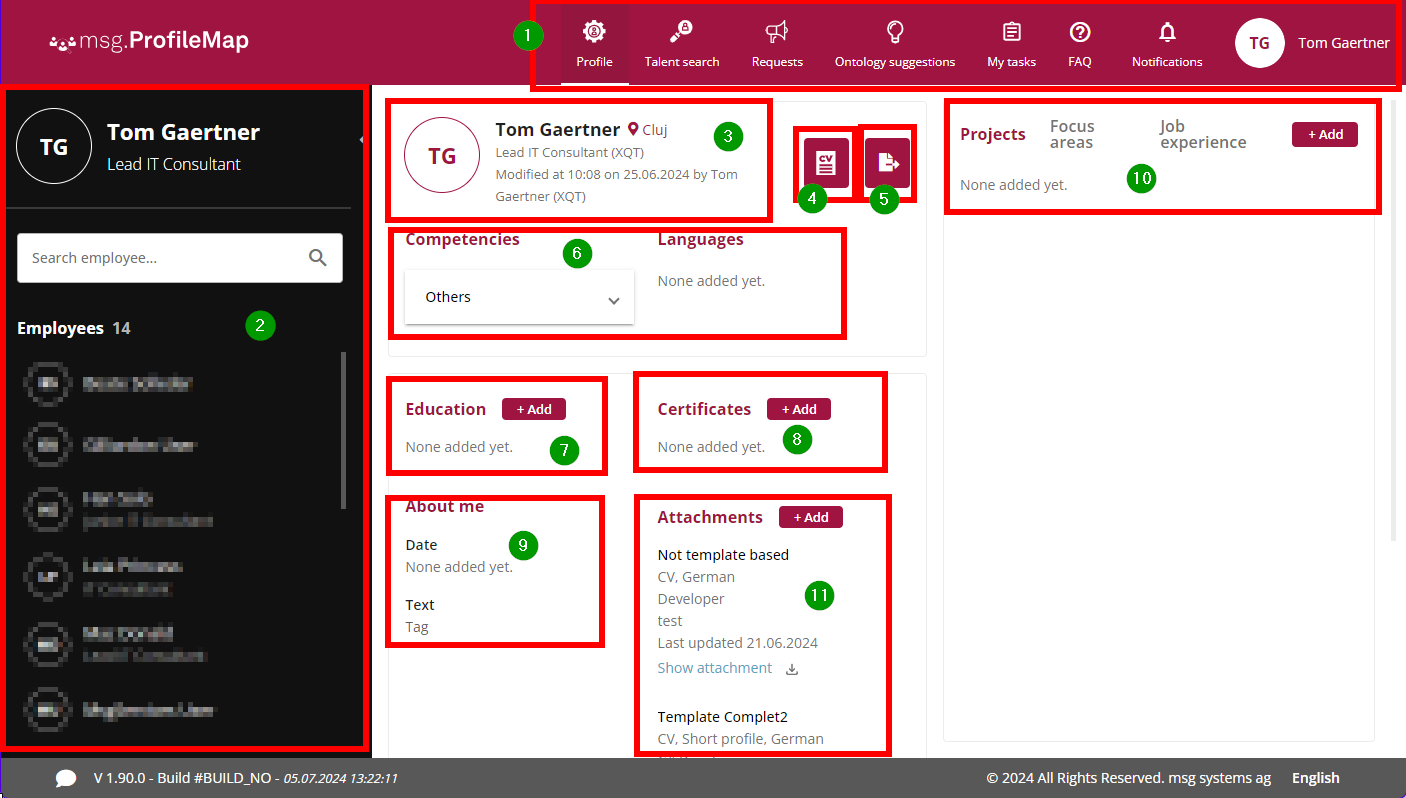
- Top Menu: Quicklinks to different parts of the application and to FAQs. Depending on assigned roles and used version, the content of this menu can differ.
- Search for employees: Only available for msg.ProfileMap Advanced-Packet if users have at least one of the following roles:
- Line Manager
- ProfileManager
- Basic information about the user: Some information like the name and department are provided by IDM.
- Upload CV: upload an already existing CV in PDF- or DOCX-format for the initial setup of a profile
- Export Profile: export / download the profile into a template (PPTX- or DOCX-format)
- Competencies and Languages: competencies and languages can be edited manually by the user
- Education: user can list their education like a degree or continuous education.
- Certificates: user can list their certificates and also upload a document
- About me: the birth date can be entered and also a short text
- Information about work experience: user can enter information about their projects, their focus area and their job experience.
- New since R04/2024: Attachments: different attachments can be uploaded like old CVs or new CV export for certain purposes.
Search for employees
Users with one of the roles ProfileManager or LineManager can use the employees list in the left side panel to search for a particular person. By selecting a name in the list, that person’s profile is displayed, and it can now be edited. Editing the profile works the same as for one’s own profile.
The search can be done by wildcard. Just enter the string you want to search for and all names with use the string will be listed. The search string can be part of the first or the last name. At least two characters need to be entered for starting the search.

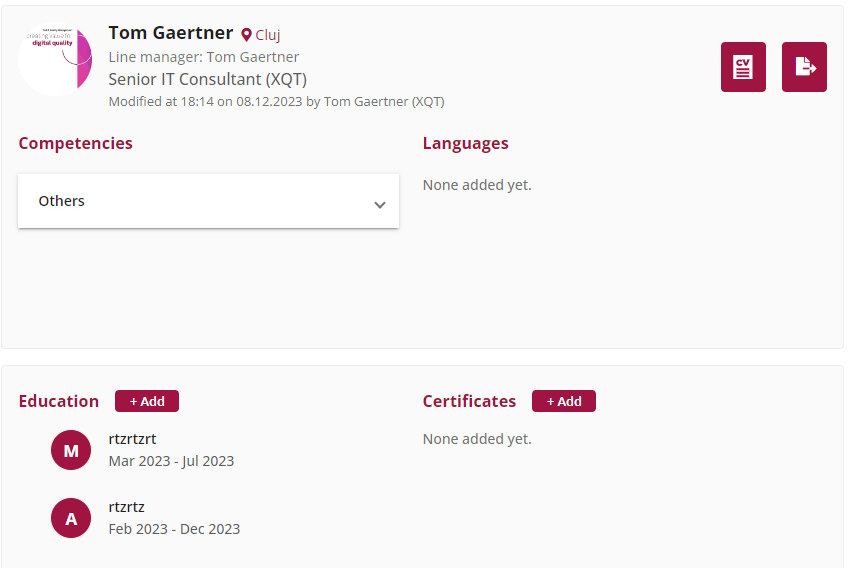
Basic information about a user
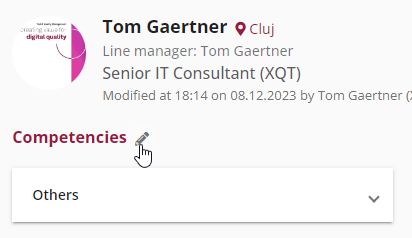
At the top of the profile some basic information about the user is listed.
Name, location, business unit, department are loaded from IDM and can’t be changed in ProfileMap. Changes regarding this data need to be done in IDM.
Change Log – move it to the top
Any of the changes in the profile described below – except profile export – are logged.
The date and time of the last change and the name of who changed the profile are listed under the name at the top of the profile.
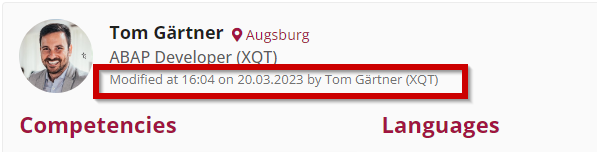
Figure 44: Change Log in Profile
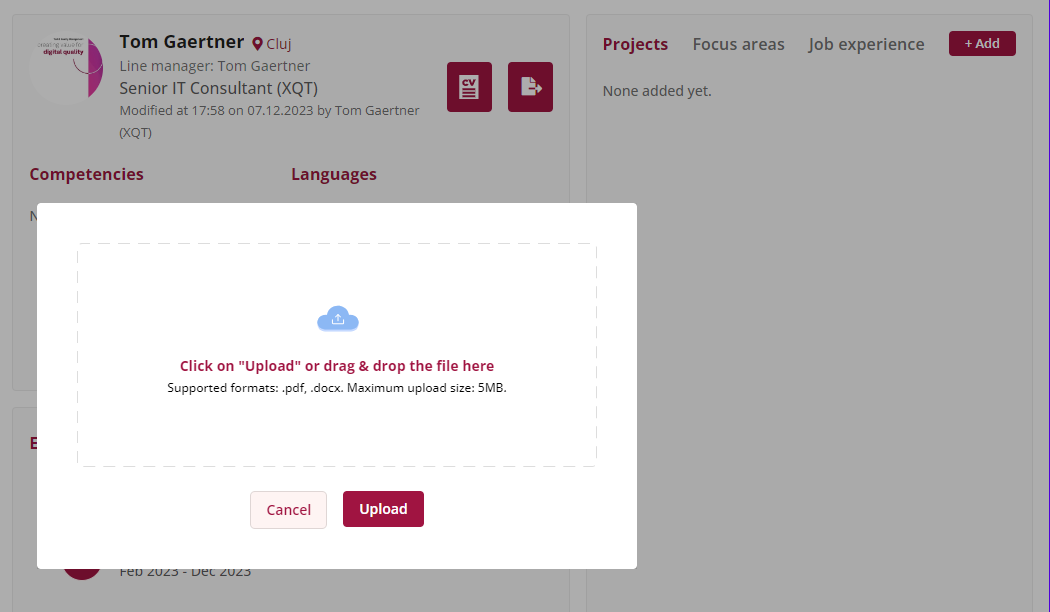
Edit your profile – initial setup by uploading an existing CV
If you already have a profile in a pdf- or docx-format you can upload it and information will be extracted from the document.
Click on the button labeled with “4” (Upload CV) in the screenshot above.
There you can select a specific file or you can move the file by drag&drop to the upload window.
When uploading the CV, competencies are extracted and added to a list which can be added to the profile.
Also the uploaded document will be shown and additional information like projects can be manually selected and added to the profile.
The original document is shown on the left, the extracted information on the right side of the screen:
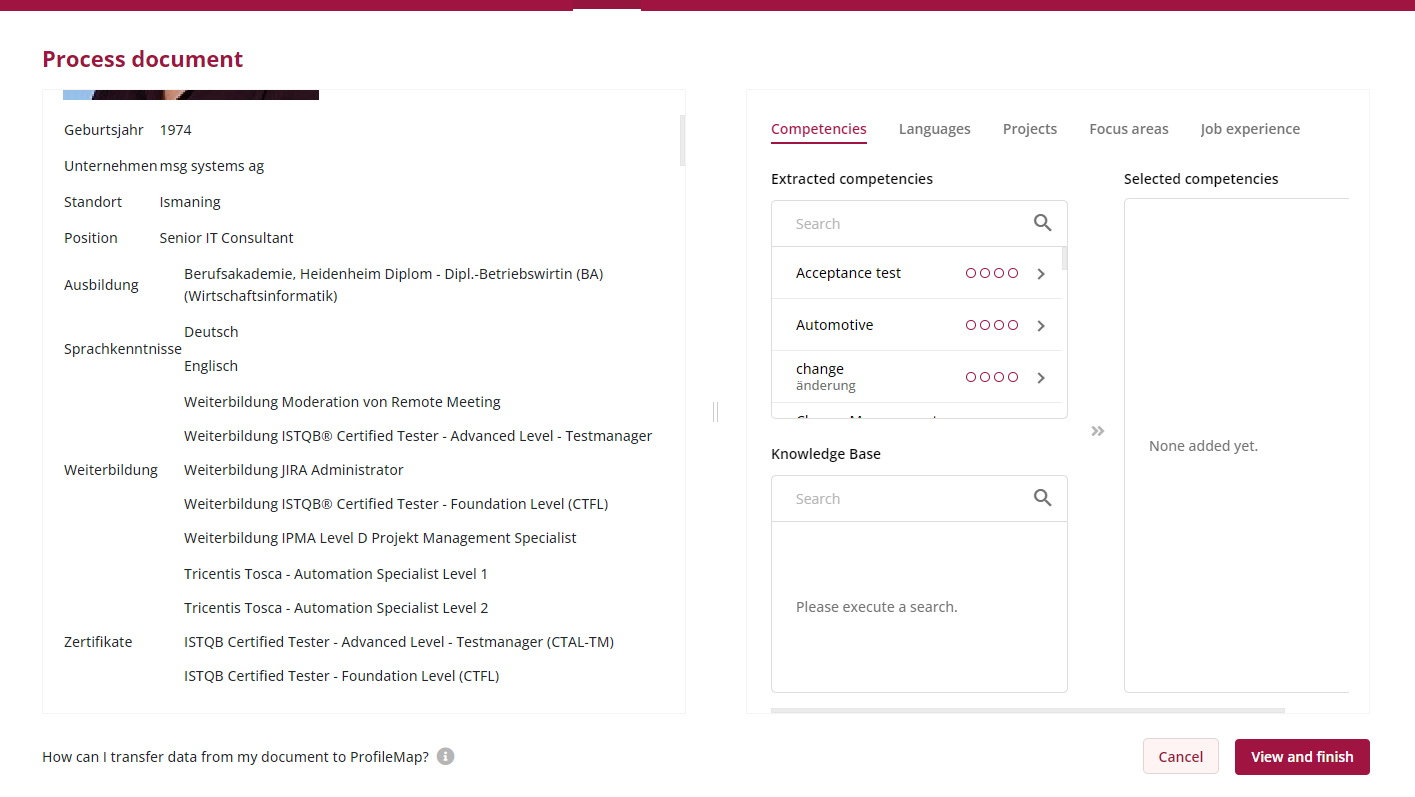
On the right side you can switch between the different information groups like competencies, languages, projects, focus area, job experience.
When you added all the information to the right side you want, follow the next steps:
- Click button “View and finish”
- Check information
- “Cancel” the process and start from scratch OR go back to “Edit” the profile OR “Save and finish” the initial upload.
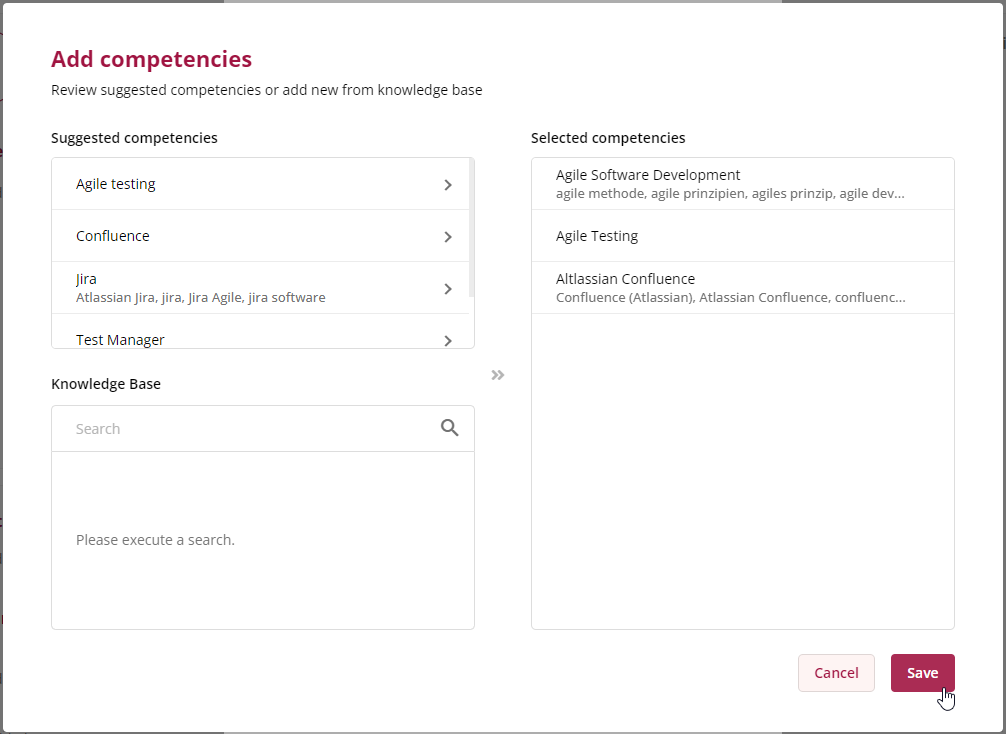
Edit Competencies

The extracted competencies are listed in the field “Extraced competencies”.
You can check them and move them to the right side “Selected competencies”. You move the competencies by clicking on the arrow or on one of the dots.

The dots are are the “skill level” and indicate the experience you have with this specific skill. If you don’t select a skill level, the default of skill level 1 is set.
For details check the table in chapter “Additional Information” below.
If you miss a competence, you can search in Knowledge Base for it. Just start typing and add the competency as described above.

Mark Information in the Original Text and add to the Profile
You can also mark text in the original text on the left side and add it to different categories on the right side.
Steps to add information from the original text to the profile:
- Mark the text
- Choose one of two possible ways:
- Use context menu
- Right mouse click on the marked text to open the context menu
- Select relevant category / field for the selected text
- The selected text is added to the selected category / field
- The left side switches to the selected category if necessary
- Drag&drop information
- Select the right category on the right side
- Drag & drop the information to the right place
Use the context menu:

Drag&drop information

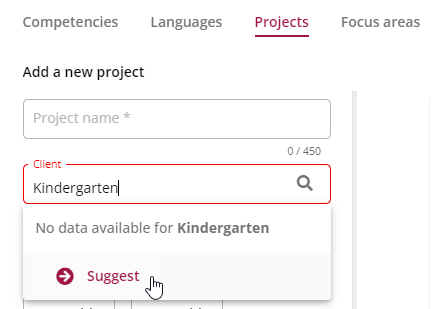
Missing Information (Competencies, Clients)
If a client or competency isn’t available you can suggest them.
A data curator will check the suggestions and you can add them later to your profile.

Edit you profile manually
After uploading an existing CV or of you don’t want to upload a CV you can edit your profile manually.
Upload / Edit a Profile Photo
To upload a profile photo click on the round placeholder in the top left corner of the profile.
In the following upload dialog a photo can be selected and uploaded to the profile.
If necessary the photo can be adjusted in the second screen.
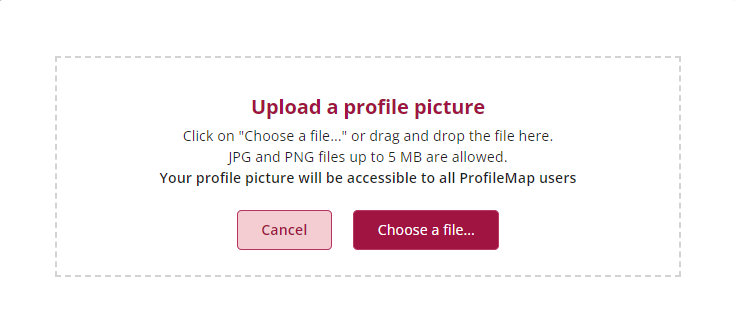

With click on “Done” the selected photo will be added to the profile.
For changing or deleting the photo, just hover over the profile photo and an edit button (in form of a pencil) and a delete button (in form of a waste basket) will be displayed.
A click on the edit button will open the upload dialog and a new photo can be uploaded which will replace the old photo.
A click on the delete button will delete the existing photo.
Edit Skills
By hovering over the “Competencies” section an edit button will be displayed (in the form of a pencil). Click this button and the “Edit competencies” window will be displayed.

The display of the competencies can be switched between BSU specific categories and skills and the whole knowledge base by selecting the appropriate radio button at the top of the window.
The BSU specific categories and competencies are managed by the Skill Manager.
The default is set to “All”, no competencies are displayed.
Use the search field on the left side to search for a specific skill you want to add to your profile.
Add the skill to the right-side panel called “selected competencies” by clicking the arrow next to the competency or on a dot representing the skill level (for details regarding the skill level check the chapter “Additional Information”
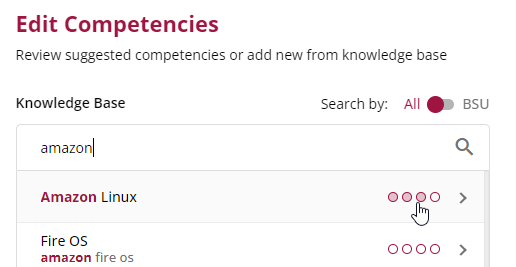
If you can’t find the required competency you can suggest it by clicking on the button “Suggest new competencies”.
Enter the required competency, add a short description and the data curator will check your suggestion and you can add the new competency after the data curator added the competency to the knowledge base. This can take several days.
To remove competencies from you profile, use the search bar on the right side of the edit window. Search for the competency you want to remove and click on the delete button in the form of a trash can. The trash can will only be displayed when hovering over it.
To change the skill level just click on the dot representing the level you want.

To save your changes click the button “Save”.
To cancel your changes click the button “Cancel”.
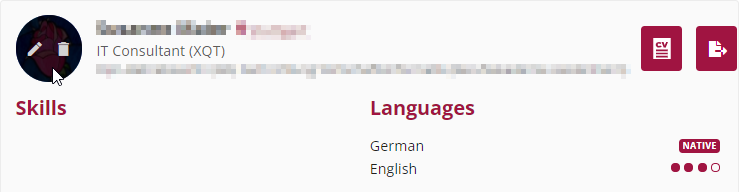
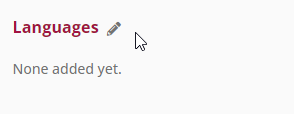
Edit Languages
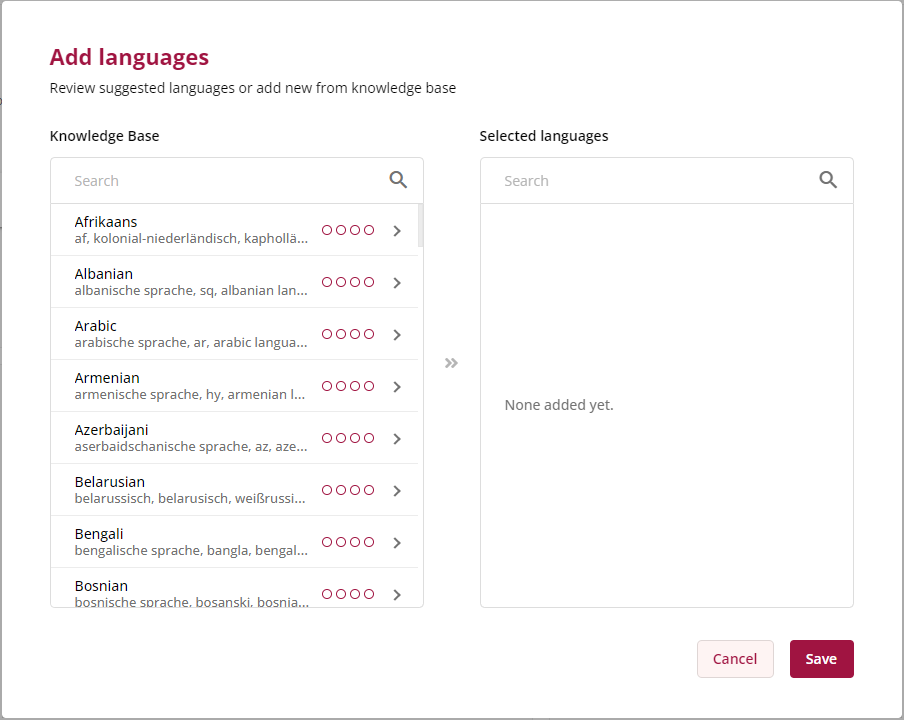
By hovering over the “Languages” section an edit button will be displayed (in the form of a pencil). Click this button and the “Add Languages” window will be displayed.
Select the desired languages from the list or use the search field to search for a specific language. Add the language to the right side panel called “Selected Languages” by clicking the arrow or one of the dots representing the language level. You can also adjust the language level represented by the “4 dot” bar (for “Native” select the maximum 4 dots) the “Selected languages” panel.
To remove languages from the “Selected languages” panel, hover over the language and click the delete button (= trash can).
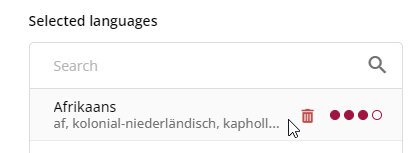
To change the skill level for a language click on the dot representing the level you want.
To save your changes click the button “Save”.
To cancel your changes click the button “Cancel”.
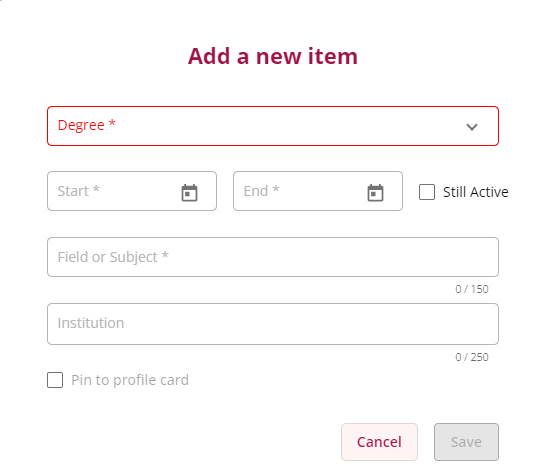
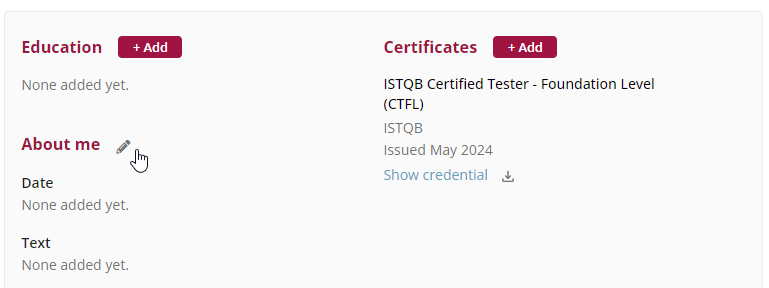
Edit Education
In the education section you can add your education like university, training, workshops, independent of if you have a degree or certificate for it.
To add a new entry in the education section, click on the “Add”-button and an edit window pops up.
In the edit window you can add the relevant information:
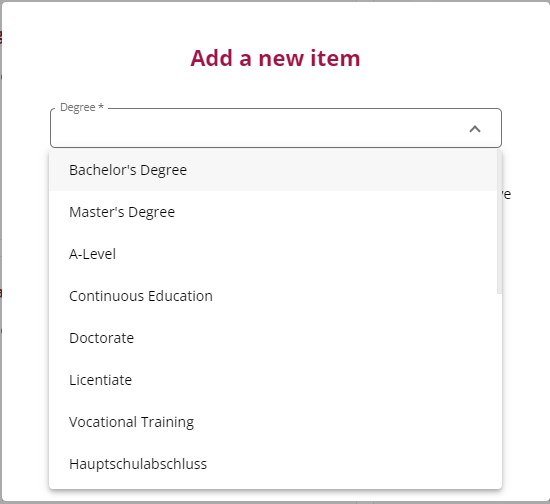
- Degree: what type of education – there are different types you can choose from, examples are shown in the screenshot below
- Start and End Date: enter the time frame of this entry – click on “ongoing” if there is no end date yet.
- Field of Subject: enter the description of this entry
- Institution: enter where you did this part of your education, e.g. university, corporation
- Checkbox “Pin in the profile card”: check the box if you want to have this education pinned at the top of your profile as “highest education”, e.g. your bachelor’s or master’s degree
If you select nothing, the latest entry (in regard of the date) is set in your profile per default.

To save your changes click the button “Save”.
To cancel your changes click the button “Cancel”.
To edit or delete an existing education item hover over the desired entry in the Education section and click the “Edit Education” button (in the form of a pencil) or the “Delete Education” button (in the form of a trash can).
When editing an entry, save the changes with a click on “Save”.

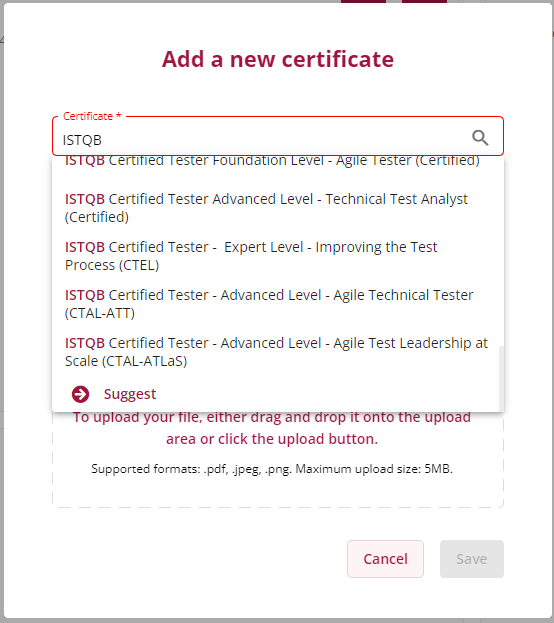
Edit Certificates
A new certificate can be added with clicking on the button “Add” net to the header “Certificates”.

A window opens where the details for the certificate can be entered:
- Certifcate: (mandatory) name of certificate (check the certificate itself for the correct name); start typing to get the list of already existing certificates. Choose the correct one.
If the correct one isn’t listed, you can suggest the required certificate with clicking on the entry “Suggest” - Issuing organisation: (mandatory) name of organization which issued the certificate
- Issue date: (mandatory) date when the certificate was issued
- Expiration date: (optional) date if there is an expiration date for a certificate.
- Upload: (optional) a pdf or jpg version of the certificate can be uploaded. Use the file selection screen or use drag&drop.
If the upload needs to be replaces, hover over file name and delete the old file with a click on the trash can and upload a new file. - As soon as all mandatory fields are set, the “Save” button will be active. With click on the “Save” button the data will be saved and the window will close.

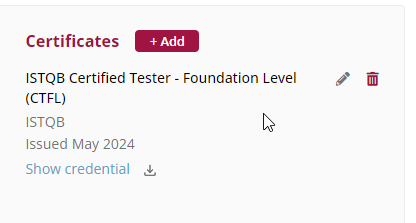
To edit or delete the whole entry for a certificate, hover over it and use the pencil for editing the entry and the trash can for deleting the whole entry.
The uploaded file can be downloaded using the link in the overview.
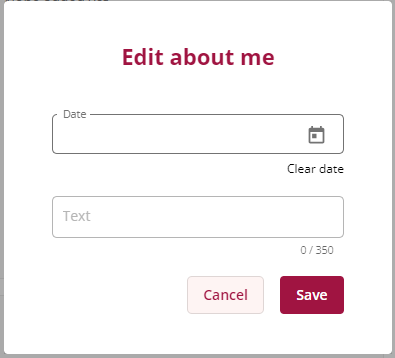
Edit “About me”
For additional information about the person there are two additional fields in the profile.
There is one date field and one text field. Each field can be referenced in the export template. Which kind of information is entered needs to be defined by each business unit itself.
Examples for usage: birthdate, start date with current employer, city of birth, country of birth, location, link to online profile (e.g. LinkedIn) etc.
By hovering over the “About me” section an edit button (in form of a pencil) will be displayed. With a click on this button an edit window will appear.
Data can be added. With click on “X”-Button the content will be deleted and empty values will be saved.
Edit Projects
Last updated for Release R03/2024
In the Project section different projects can be added.
To add a new project click on the “Add”-button next to the headers.

Select or fill in all the required information in the displayed fields:
- Language English / German: The default language is the application language selected in the bottom right corner. At least the mandatory fields in this language have to be set before saving.
- Project name: (mandatory) name of the project
- Client: (optional) the client can be selected from all clients available in the ontology. Missing clients can be suggested. After the Data Curator added the new clients to the ontology, it can be selected in the project.
- “Car” – custom field specific for each BSU: (optional) “Car” is a test value and can differ from BSU to BSU if they are using this field. If a BSU isn’t using this field, it won’t be available in UI.
The content needs to be provided by each BSU as an excel template.
Please contact ProfileMap HelpDesk for more details and a template for uploading data. - Job Roles: (mandatory) select your relevant job role for this project. Multiple job roles can be selected. Start typing to get suggestions from the ontology. If the specific job role is missing, it can be suggested.
After the data curator added the job role to the ontology, it can be added to the project. - Start: (mandatory) start date (month / year) of the project – also used for sorting the projects in the project history.
- End / Still active: (mandatory) each project needs an end date or if it’s still ongoing a check in the checkbox for “Still active”.
- Short description: (optional) a short description of a project, usually used in templates for short profiles.
- Description: (optional) a longer description for the project. Depending on requirements provided by the management of the BSU it can contain more details regarding the project itself and the specific tasks of the profile owner and/or used tools and methods.
- Add competencies: (optional) with click on this button, automatic text extraction will use the fields “short description” and “description” to extract competencies and list them for selection.
Missing competencies can be searched and selected or suggested in the screen as needed. - As soon as all mandatory fields in the default language are set, the “Save” button will be active. With click on this button the data will be saved.
Example: if English is selected as the application language, all mandatory fields for English project data need to be entered. If only the German data is entered, saving the data is not allowed. But the German data can be left empty.
- To add the information in the other language, click on the language.
- All information, except the job roles, dates and competencies – and, if used, the custom field – need to be added manually, as no automatic translation will take place.


After saving the data, the new project will be listed in the project history.
To edit or delete a project, hover over it and use the pencil for editing the entry and the trash can for deleting it.
It’s also to show more information for a project when clicking on the link “show more”.

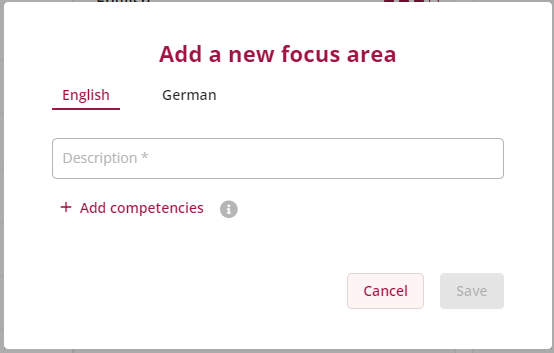
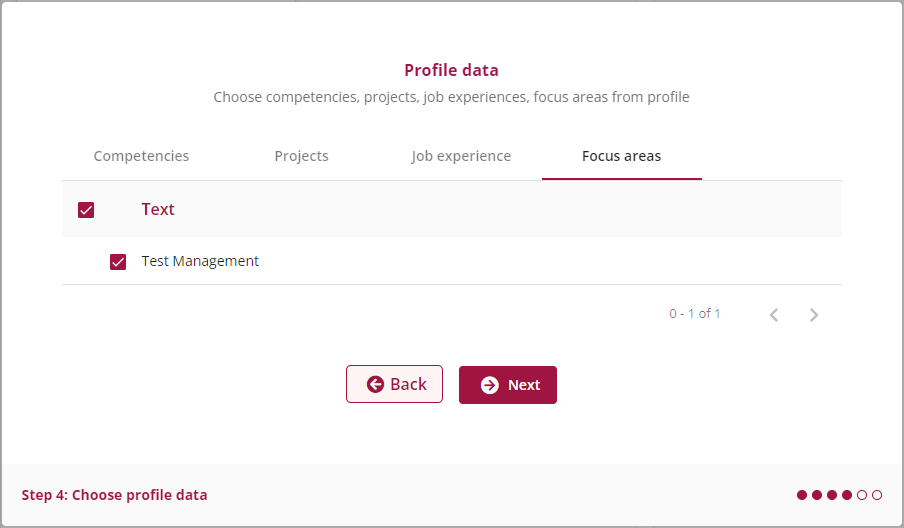
Edit Focus Area
Like editing projects the user can add their focus areas.
They can be added in German and English, the mandatory language depends on the language selected for the application.
Adding and editing competencies work the same as in projects.
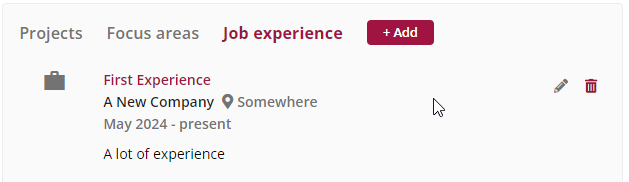
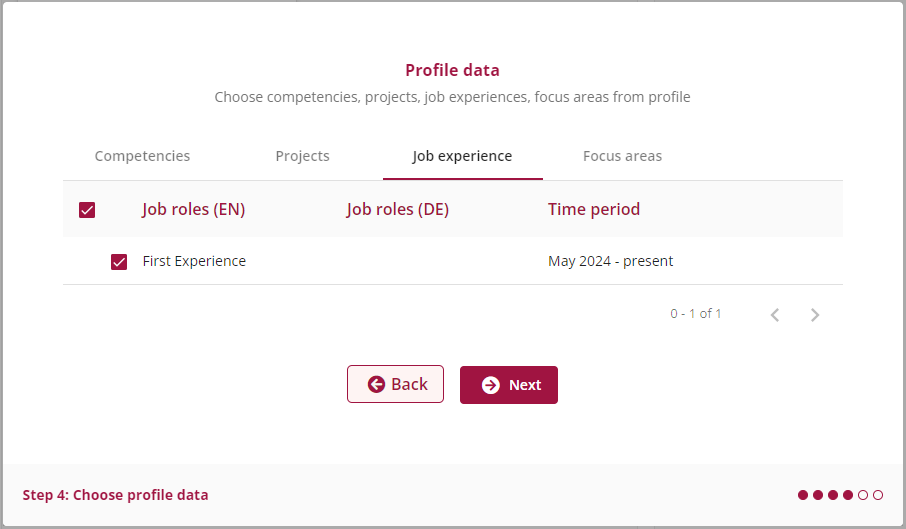
Edit Job Experience
To edit the section for Job Experience, click on the header and the list for job experience is shown.
Click on the “Add”-Button to add a new job experience. An edit window will be displayed where different information can be entered. With click on button “Save” the information will be saved.
All fields to describe a job experience are free text and not restricted in any way by available entities in the ontology:
- Job role: (mandatory) the job role(s) in this company
- Company: (mandatory) company name
- Location: (optional) city
- Start: (mandatory) start date of the job experience
- End / still active: (mandatory) end date of job experience; if it’s still ongoing, check the checkbox “still active”.
- Description: (optional) details of job experience like descriptions of tasks / competencies
As soon as all mandatory fields are set, the “Save” button will be active.


After saving a job experience, it’s added to the list.
To edit or delete a job experience, hover over it and use the pencil for editing the entry and the trash can for deleting it.
Edit Attachments (R04/2024)
It is possible to upload documents to profiles.
This can be original profiles as reference or new profiles with are adjusted for certain job roles or customers.
To add a new profile click on the “Add”-button next to the header “Attachements”.
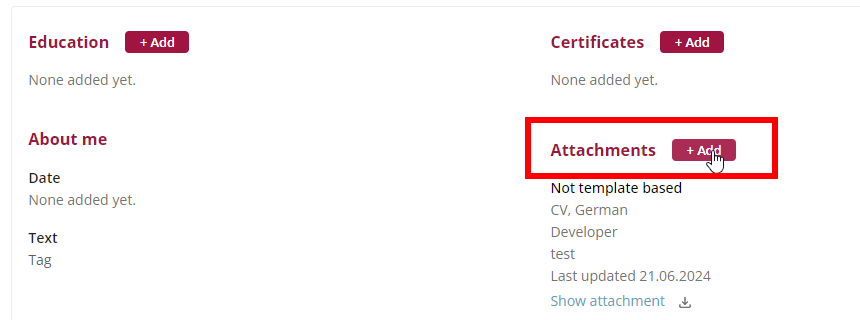
Available fields to describe an attachments:
- Type: default = CV (can’t be changed)
- Radio buttons “Template based” / “Not template based”: (mandatory) this means if the CV is based on a certain export template provided in ProfileMap, e.g. customer specific template.
If the document is not based on a certain template, select “Not template based”, e.g. if it’s a CV from a job application. - Template (if “Template based): (mandatory) select the relevant template used for the CV export
- Language (if “Not template based): (mandatory) select “English”, “German” or “Other” according to language used in the relevant document.
- Job roles: (mandatory) several job roles can be selected from the ontology which relate to the content of the CV
- Additional information: (optional) additional information can be entered, e.g. specifics about the content of the uploaded CV like Focus Area or customer
- File: (mandatory) the relevant file needs to be uploaded. It’s possible to upload docx-, pptx or pdf-files.
Files can be selected either with drag&drop or selected with click on the upload button. 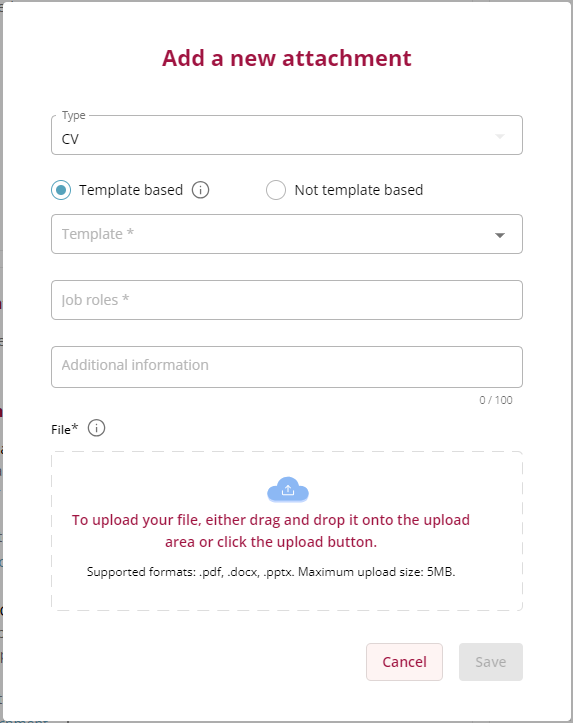
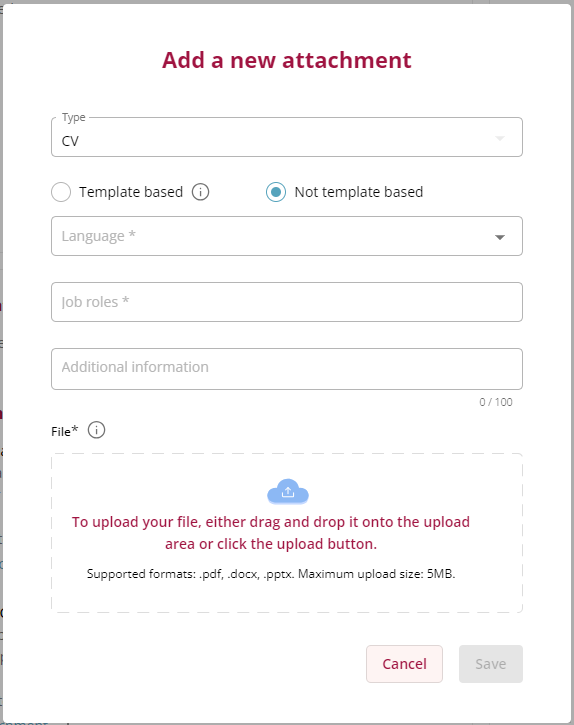
As soon as all mandatory fields are populated the “Save”-button is activated. With click on the “Save”-button the data is saved and the popup-window closes.
A new entry is listed under the header “Attachments”.
In the screenshot below examples for “Template based” and “Not template based” are shown.
To edit or delete an attachment hover over the relevant entry and click the “pencil”-button to edit and the “trash can”-button to delete the entry.
Note:
When editing “template based” attachments, the following information is read-only:
- selection “template based” / “not template based”
- selected template
If the template changes the old attachment needs to be deleted and a new entry for the new attachments needs to be created.
The button “Show attachment” can be used to directly show (.pdf) or download (.docx, .pptx) the attachments.
The number of attachments is limited to a maximum of 10.

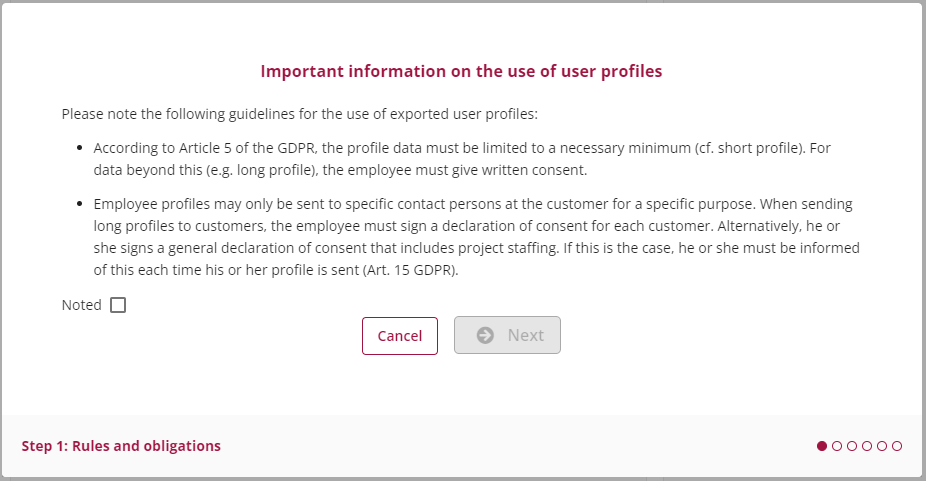
CV Export
After a profile has been successfully updated, the user can export the profile by clicking on the “Export CV” button.

There will be several windows where different information can be selected for the export.
It starts with a window with information regarding data security guidelines. Only after confirming the window with click on the checkbox “Noted” the button “Next” can be clicked for the next step.
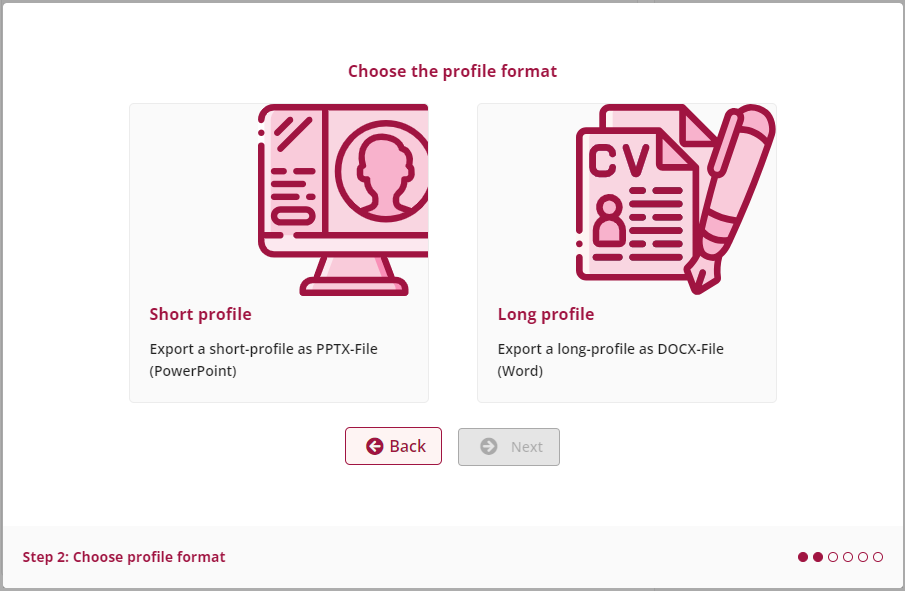
In the next window the type of the profile can be selected: shot or long profile – depending on the requirements.
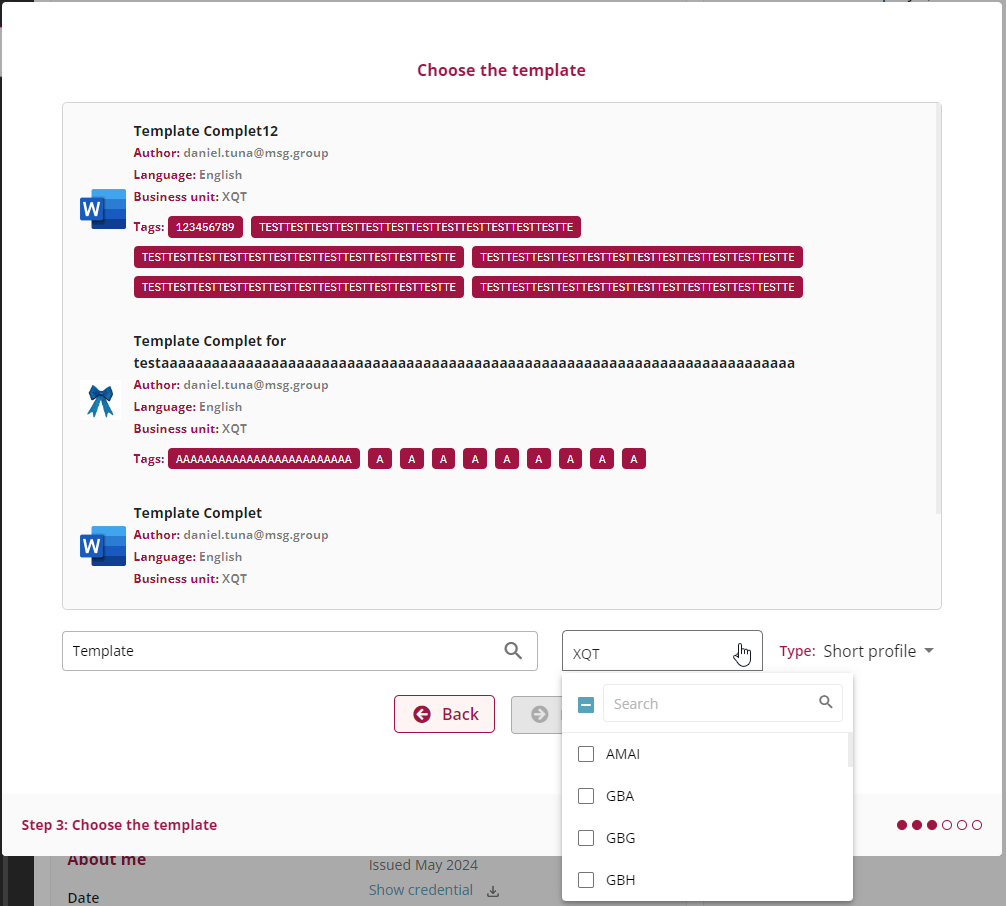
After selecting the profile type a list of available templates for this type of profile is listed. As default initially only templates of the user’s own BSU are listed. If a template from another BSU is needed, the filter below the list needs to be adjusted.
The template can be searched for with entering its name in the field “Search for templates”.
Select a profile from the list and click “Next”.
In the next window the relevant profile data for the export can be selected.
Relevant competencies, projects, focus areas and job experiences can be selected.
If there is no data for a category, the category isn’t available for selection.

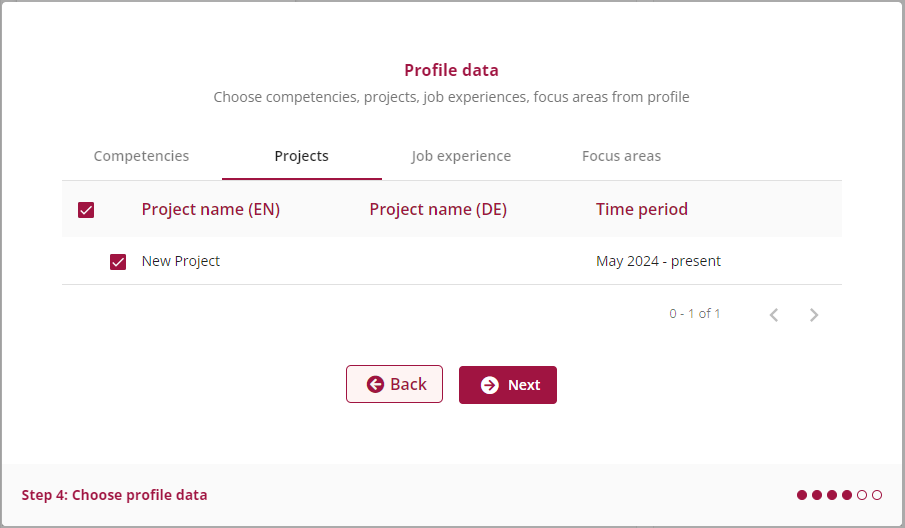
After selecting the relevant data for the export, click on “Next”.
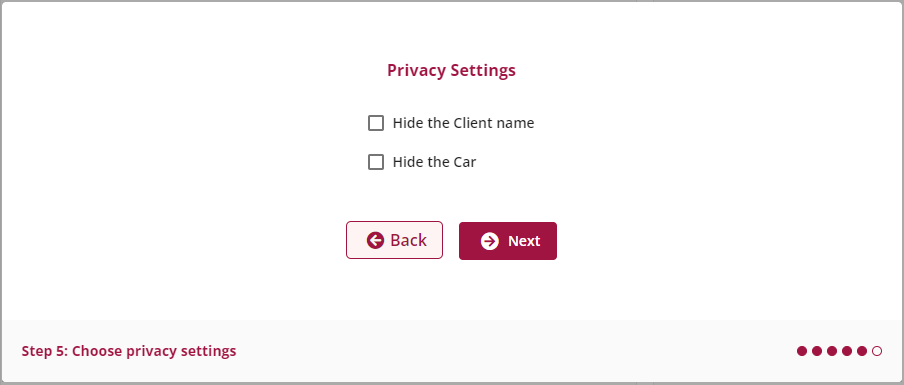
There a selection can be made do display the client names or not.
Also the custom field (in this example “Car”) – if available in own BSU – can be hidden if not relevant for the specific template / export.
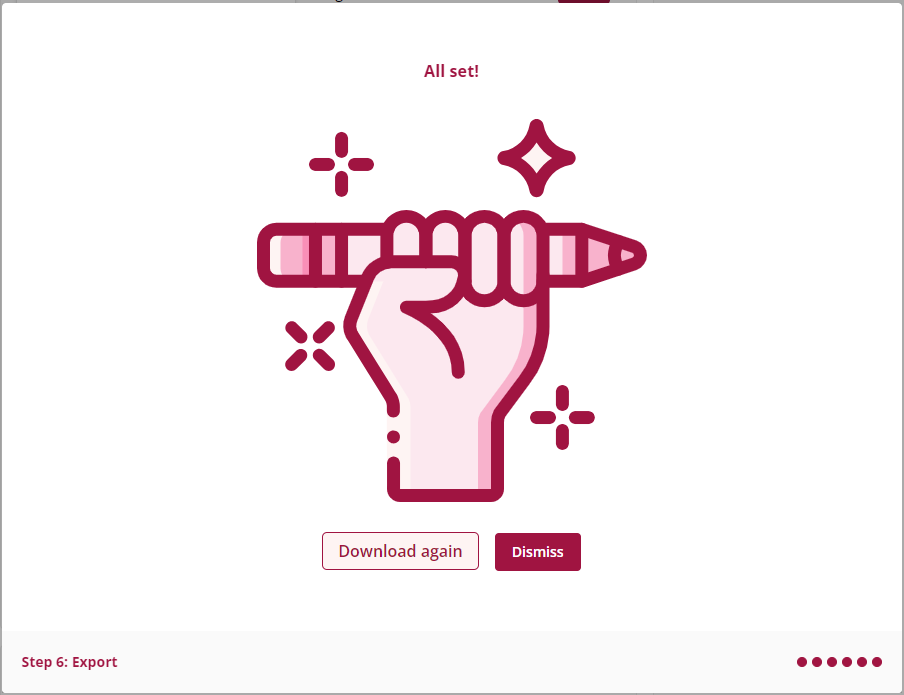
After the last selection, the download starts and the exported profile can be found in the Download folder on your computer.
With click on “Dismiss” the download dialog will close.
Additional Information
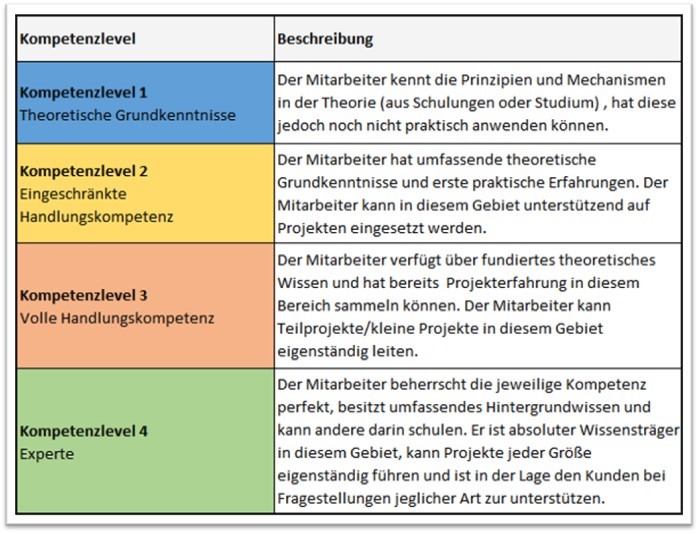
Skill level
| Skilllevel | Description |
| Skilllevel 1 – Basic Knowledge | Employee knows the principles and mechanism and the theory (from training or school) but doesn’t have any practical knowledge. |
| Skilllevel 2 – Limited Expertise | Employee has comprehensive theoretical knowledge and first practical experience. They can work in projects together with a more experienced colleague. |
| Skilllevel 3 – Advanced Expertise | Employee has established theoretical knowledge and already has practical experience from projects. They can lead subprojects or smaller projects in this field. |
| Skilllevel 4 – Expert | Employee has great expertise and has extensive knowledge regarding this skill. They can provide training for others. They can lead any project of any size on their own and can assist customers regarding their questions or problems. |